DIGITAL PHOTOGRAPHY & IMAGING - WEEK 4 EXERCISE
10/10/2023 - 17/10/2023 ( Week 3 - Week 4)
Alyssa Lim Shyn Yi (0365877)
Digital Photography & Imaging / Bachelor of Design (Honours) in Creative Media / Taylor's University
Week 4 - Exercise (DIGITAL COLLAGE)
TABLE OF CONTENT
1. INSTRUCTIONS
2. LECTURES
3.
TUTORIAL
5. REFLECTION
INSTRUCTIONS
<iframe
src="https://drive.google.com/file/d/1aPKitxEvC1GXXJQCoim1Q7NlOUI_fcyv/preview"
width="640" height="480" allow="autoplay"></iframe>
LECTURES
Week 4 Lecture Slides
<iframe
src="https://drive.google.com/file/d/1ANAKm24K_ZnzT6tpgp2xpgoidDuElLD2/preview"
width="640" height="480" allow="autoplay"></iframe>
Summary of My Lecture
In this lecture, Mr Fauzi taught us about using the adjustment layer
& filters inside Adobe photoshop. Adjustment layer is quite a useful
tool in editing, discarding adjustment or restore your original image at
anytime. After adding an adjustment layer, a properties panel will
appear several functions to edit our image. For example, brightness /
contrast, level, curves, exposure and selective color. As for filters,
it is known as an essential element of Adobe's graphics editor. Filters
can be used to change color, add blur, or create new image effects.
TUTORIAL
For week 4 tutorial, our lecturer provided us these videos talking about
vital tools and demo of doing project 1. The first video discussed about
removing background in Photoshop using pen tool. The link is
here.
The second video discussed about fixing skin tone using curve
adjustment layer in Photoshop. The link is
here.
The third video explained about adding an adjustment layer to a single
layer in Photoshop. The link is
here.
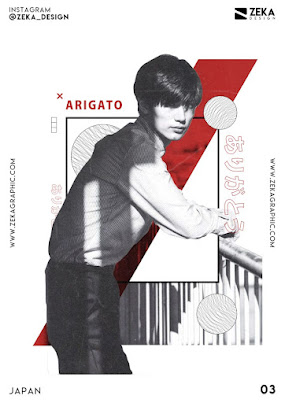
PRACTICAL (DIGITAL COLLAGE)
Original Picture (Before adjustment, layers & filters)

Figure 1.0
 \
\
Figure 1.1
.png)
Figure 1.2 (Process)
.png)
Figure 1.3 (Process)
REFLECTIONS
In conclusion of my learning process throughout the past few weeks, I did enjoy using photoshop to do my exercises. Moreover, I was happy that I got to learn about adjustment and layers while doing my composition work. I was looking forward to learn more about using photoshop in the future.
Digital Photography & Imaging Week 8: Independent Learning Week

Comments
Post a Comment